http://www.ozhpv.org.au/shed/files/tubemiter.exe
Mitering is the fitting of two tubes. You can't really just weld two tubes that hit each other at a 90. You probably could, but you'd have to be a better welder than I.
Here is my process of mitering:
1. Open the application and type your specifications (Fig 1):
 Figure 1: Miter Program
It will ask you to enter the wall thickness (gauge) and diameter of tube to be mitered as well as the wall diameter of the joining tube. The hardest thing about this program is figuring out the relevant angle. The angle calculation only measures tubes meeting in parallel (i.e. down tube to head tube) not tubes meeting in perpendicular (i.e. down tube to bottom bracket). I hope that makes sense for you, because it took me awhile to figure that out.
2. Print out the paper and wrap around the tube (Fig 2):
2. Print out the paper and wrap around the tube (Fig 2):
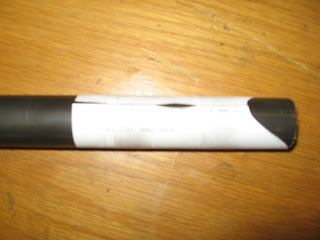 Figure 2: Wrap before you... miter!
I think this is pretty straight forward, use low stick tape so that you can remove it easily if need be.
3. Draw your line with a sharpie and remove the mitering paper, double checking the angle given by the paper with the tube your about to join to. Make sense? No? Look at the damned figure! (Fig 3)
 Figure 3: Checking it twice.
4. Put the tube-to-be-mitered in the vice, clamp down and start sawing away. I've been using two methods.
A. Use hacksaw to make rough cuts and then smooth with a half-round file and round file.
B. Make rough cuts with a air powered saw, I am not sure what they're exactly called.
The air powered works much faster, but its a lot easier to take to much off. I enjoy working with my hands but have time dilemmas so I am mainly using method B.
One thing to make sure of is to thin the convexities, or peaks (as opposed to concavities and troughs) of the tubes while cleaning with a file. The highest point of the miter should be somewhat thinner the rest of the tube - as has been told to me. This makes the tubes sit together a bit nicer. On the miter print out itself there are little jetty lines that rise above the main cut out which denote the areas that can be thinned.
 Hallelujah!
i'm reading it. so cool to see your progress
ReplyDelete